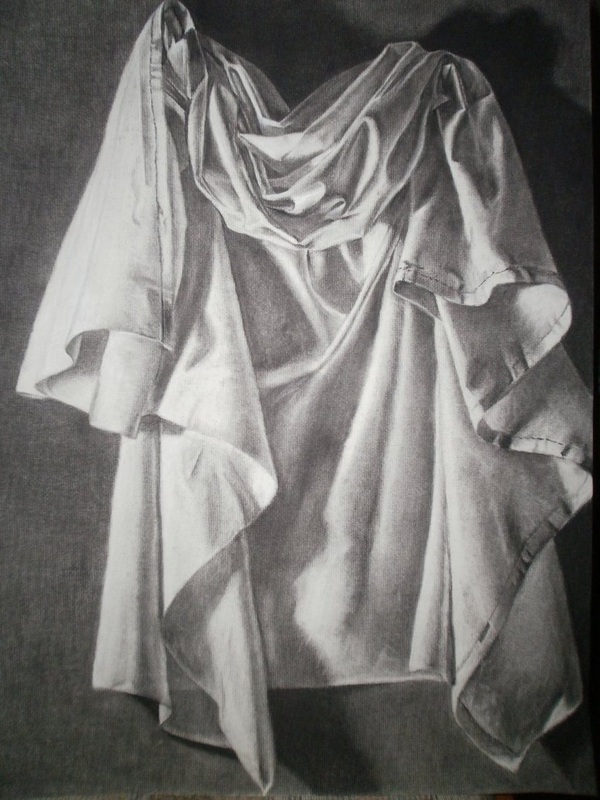
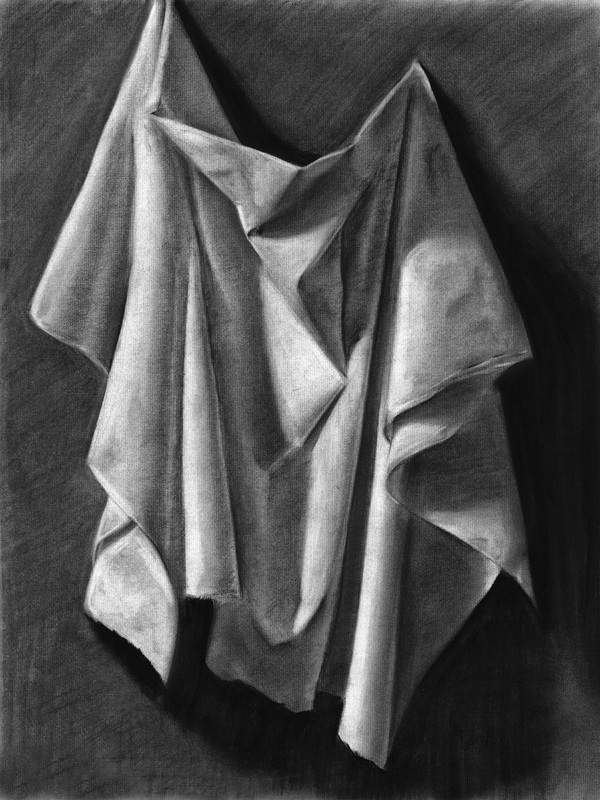
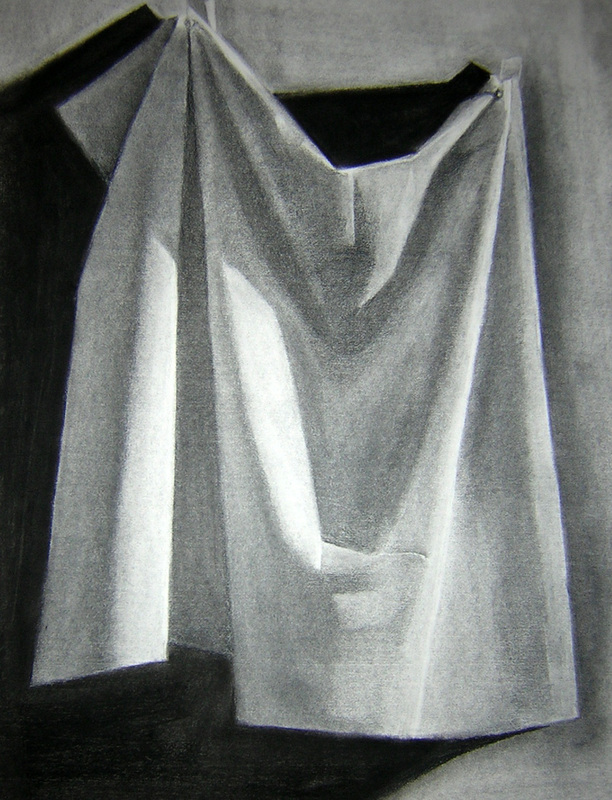
DRHSART
  • About
    • Scholastics
    • Take Art!
    • The Creative Corner
    • Jackson Pollock Collaboration
  • Studio
    • AP 2D ART AND DESIGN
    • ART 45 >
      • Art 45 Assignments Blog
    • Independent Study >
      • Independent Study Assignment Blog
    • Art 3 >
      • Art 3 Assignments Blog
    • Art 2 >
      • Art 2 Assignments Blog
    • Art 1 >
      • Art 1 Assignment Blog
  • Gallery
    • DRHSART GALLERY
    • Highlights
    • Student Portfolios
  • Featured Artists
  • DRHSART LEVELS

Mixed Media Perspective

3/7/2016

1 Comment

 
Picture
Picture
Picture
Picture
Picture
Picture
Picture
Picture
Picture

​What is Mixed Media?

The term "mixed media" refers to artworks that are created through the use of more than one type of artistic medium.  Often, the artists use some form of collage in combination with drawing and painting media.  In our case, we will be working with collage, acrylic, graphite, ink, and colored pencil.  

Materials for this project:
11"x14" Masonite Board
Magazines, Newspaper, Old Books, etc.
White Acrylic Primer or Gesso
Acrylic Paint
Graphite Pencil
Pen (ball point or sharpie)
Prismacolor Pencils
Photo Reference of a building in perspective


Timeline for this project:
Day One:  Lecture / Practice
Day Two:  Collect Imagery for Approval / Collage 
Day Three:  Begin Drawing
Day Four:  Mixed Media Drawing
Day Five:  Final Day to work
​Day Six:  Critique

What Will You Create?

The students will begin with creating a collaged background on a 11"x14" sheet of Masonite board.  The students should seek a variety of typographic elements, and should tear the collage media rather than using mechanical tools such as Exacto knives or scissors. Absorbent papers, such as newspaper, will work better than glossy textured magazine pages.

Once the surface has been covered with the collage media, the students will "quiet" the typography with a light wash of white acrylic primer.  This should be done in a very expressive way, and should leave some evidence of the typography below the surface of the primer.  When the primer has dried, the students will stain the surface with watered down acrylic paint.  Drips, splatters, and irregularities are welcomed in this stage of the mixed media drawing.

​Next, the students will use a pencil and a ruler to illustrate, using the rules of linear perspective,  the building that was chosen as a reference.  The structural marks of these perspective drawings should be made lightly, and should be mostly disguised when the image is finished.

Once the students have completed the basic structure of the building, and have proven an understanding of linear perspective, they will begin to loosely render the drawings with layers of diluted acrylic paint. The students will use their photo reference to guide their color choices, and students are encouraged to paint with "selective detail". The amount of detail used in the painting is up to the students, and the treatment of the paint should be aimed at expression more than mechanical precision.

At this point, the students should feel free to add small details with pencil and pen, but should continue to keep things fairly loose and expressive. Once the line work has been completed, the students can decide what other elements their work may need. Some students will add more collage elements, some will embellish the drawings with colored pencil, others may add layers of acrylic paint.  The quality of the finished product should seem heavily layered and expressive.


What is Linear Perspective?

Helpful Links:
One Point Perspective Tutorial
Two Point Perspective Tutorial
​

Examples of One and Two Point Perspective:
Boxes In One Point Perspective
Street Scene in One Point Perspective
​Box Letters in One Point Perspective
Boxes in Two Point Perspective

Linear perspective
, a system of creating an illusion of depth on a flat surface. All parallel lines (orthogonals) in a painting or drawing using this system converge in a single vanishing point on the composition’s horizon line.

Linear perspective is thought to have been devised about 1415 by Italian Renaissance architect Filippo Brunelleschi and later documented by architect and writer Leon Battista Alberti in 1435 (Della Pittura). Linear perspective was likely evident to artists and architects in the ancient Greek and Roman periods, but no records exist from that time, and the practice was thus lost until the 15th century.

The three components essential to the linear perspective system are orthogonals (parallel lines), the horizon line, and a vanishing point. So as to appear farther from the viewer, objects in the compositions are rendered increasingly smaller as they near the vanishing point. Early examples of Brunelleschi’s system can be seen in Donatello’s relief St. George Killing the Dragon (c. 1416–17) and Masaccio’s painting The Holy Trinity (1425–27), a dramatic illusionistic crucifixion. Andrea Mantegna(who also mastered the technique of foreshortening), Leonardo da Vinci, and German artist Albrecht Dürer are considered some of the early masters of linear perspective. As the limitations of linear perspective became apparent, artists invented additional devices (e.g., foreshortening and anamorphosis) to achieve the most-convincing illusion of space and distance.
1 Comment

Drapery Drawing:  Seeing Light and Shadow

10/2/2015

1 Comment

 
Picture
Picture
Picture

Drawing Without Line

The focus of this drawing activity is to train students to see the nuance of light and shadow.  This is a value study that requires the students to draw “linelessly”.  The final product should have a full range of values (lightest light to the darkest dark , with subtle values between), should fill the entire picture plane effectively, and should be absent of hard lines that might cause the drawing to look flat. These drawings will be evaluated heavily on craftsmanship and the control of the medium.
View a Time Lapse Drawing Example
Seeing Basic Forms in Drapery


THE RUBRIC
TIME ON TASK  25 points
This category measures the artist's willingness to work outside of the scheduled studio time to get the work ready for critique.  Additionally it measures the artists level of focus during the assignment.

CRAFTSMANSHIP  25 points
Drawings should be free of wrinkles, smudges, or tears, and the artist should demonstrate control over the media.  This category refers to the overall care taken with the work.

FOLLOWING DIRECTIONS  25 points
This category measures the artist's subtle use of shading to produce the illusion of three dimensional form.  There should be little evidence of line in the finished product.  These works were to be done on a full sheet of 18”x24” paper with charcoal.

OVERALL DESIGN  25 points
The space should be used in a way that recycles the eye and keeps it in constant motion throughout the space.   There should be enough contrast used so that the drapery is visible on the page.  Most importantly, the space should not have empty voids that the get unnoticed.  The subject should fill the space effectively, and should look as if the artist was in control, rather than the drawing being in control.
1 Comment

The Appropriated Self Portrait

8/31/2015

0 Comments

 
Picture
Picture
Picture
Picture

About this Project

Using the history of art since 1900 as a guide to self-discovery, students will choose an influential painting to research, evaluate, and appropriate. Through this process, each student will not only learn about the contextual history of the image, but will also discover the techniques and control required for its making. The final product should emulate, as closely as possible, the mood, surfaces, linear gestures, hues, and intensity of the original painting.  Students are also required to change the context of the original image by somehow making it a self portrait.

All students will have two options as they approach this project. The first option is to recreate the original painting, replacing one of the figures with his or her own likeness. The second option is much more difficult, and requires the student to consider the visual characteristics of the studied artist’s collective body of work, creating a self-portrait that speaks clearly to the artist’s use of composition, color, line, texture, and mood. This second option will require the student to become very familiar with the tendencies of the studied artist.


Click here to see the official handout for this assignment
Click here to see more examples
0 Comments

Abstract Mono Printing 

3/27/2015

1 Comment

 
Picture
Picture
Picture
Picture
For this project we will be utilizing a printmaking process called mono printing or monotyping. We will also learn about other types of printmaking and familiarize ourselves with important terms. We will review steps and vocabulary in class, but if for any reason you want to see them again they are here for your convenience. Additionally there are links to help you understand the art movement we are studying while creating mono prints, Abstract Expressionism.

Links:

Walton Ford Video 
Printmaking Terms
MoMA Interactive Tutorial
Abstract Expressionism Information 

PowerPoint of printmaking terms from class

printmaking_terms_.pptx
File Size: 34804 kb
File Type: pptx
Download File

PowerPoint about Abstract Expressionism from class

abstract_expressionism.pptx
File Size: 21953 kb
File Type: pptx
Download File

silent_critique_directions.docx
File Size: 90 kb
File Type: docx
Download File

Project Description:

Printmaking is an important artistic practice that has many subtypes and a rich historical background. This project will serve as an introduction to printmaking that can be explored further in the future. As a starting point for this project we will explore Abstract Expressionism, a post–World War II art movement in American painting that developed in New York in the 1940s. The movement was characterized by art that does not depict objective reality, but rather a subjective expression of inner experience. We will look to artist such as Jackson Pollock, Barnett Newman, Cy Twombly, Willem de Kooning, Ellsworth Kelly, Franz Kline, Lee Krasner, and Mark Rothko. After discussing Abstract Expressionism and these artists, we will create abstract mono-prints. We will review the steps to this process as a class and spend some time practicing, but also steps can be found here. The intention of this project is to expose you to a new technique, provide you with more knowledge of art history, and help you understand abstraction.

Project Criteria:


Our first steps will involve taking an image or object and zooming in on it, as seen on the left. We will remove ourselves three times from the original image by creating three zoomed in sketches based on the original. This will allow us to have a starting point for our abstract compositions and can be changed and transformed as the artist finds fit later. After this process is completed, the artist will start to paint their image onto their 8 x 8 piece of Plexiglas. This is an expensive material and must be re-used for the course of this project, take care of them. To keep track of your Plexiglas, write your name on a piece of tape and place it on the back to keep track of because everyone will receive only one. We will review the steps to mono printing and the different techniques possible that you may try and combine.

After we have made our prints, we will participate in an artist trade based on our less successful prints. This will involve switching with another member of the class and transforming it in any way. This will help us to experience collaboration and see how other people approached this new process of printmaking. 

Students will be responsible for turning in two high quality prints that demonstrate fine craftsmanship for a grade. In addition to these two prints, each student will turn in one of their lesser prints for the artist trade. Student grades will also be based on a written test about Abstract Expressionism and printmaking. 
Picture
Emphasis
Picture
Static
Picture
Dynamic
Picture
Unity
Picture
Texture
Picture
Symmetrical
Picture
Radial
Picture
Asymmetrical
Picture
All over painting
Picture
Pentimenti
Picture
Process
Picture
Color
Picture
Color
Picture
Expression

Creating Abstract Compositions

Creating an abstract composition can be tricky. It is not as easy to look in your own head and find inspiration for abstract images as it is to find realistic images. Look and think back to our discussion about Abstract Expressionism for more inspiration and to build your visual vocabulary. If you do not have an artist chosen for your upcoming artist study, consider choosing someone we talked about in class like Jackson Pollock, Barnett Newman, Cy Twombly, Willem de Kooning, Ellsworth Kelly, Franz Kline, Lee Krasner, or Mark Rothko. As you begin your journey choosing images to “zoom in” on to develop compositions, think about all you know about the principles of design and elements of art. Here is a list to guide you. Choose one from each category for your two prints that you will turn in for a grade (and mark them!) at the end of the assignment, but try as many as you can!


LIST ONE!


Create an abstract composition utilizing the zoom in technique to create a print that…


· Shows emphasis. Make part of your design stand out by contrasting it with other areas of the design. This emphasized area could be a different size, shape, texture, color, etc. 


· Shows static or dynamic movement. Either express static movement in a design by making the image very stable and still, or create dynamic movement by creating a design that is very active and full of energy. 


· Shows unity. Create a design that displays a feeling of harmony with all other parts of the design. This will create a feeling of completeness.


· Shows expressive texture. Create a design that has an interesting surface quality that the viewer can read. Make us want to reach out and touch your finished prints.


· Shows symmetrical, asymmetrical, or radial balance. Distribute the visual weight of the pieces of the design symmetrically by balancing what is on one side with the other. Distribute the visual weight asymmetrically by having different components on different sides that still give the impression of an even distribution.  Distribute the visual weight radially by arranging all parts of the design around a central point.


LIST TWO!
 

Create an abstract composition utilizing the zoom in technique to create a print that…

 
· Utilizes the techniques of all over painting. Make no one part of the design more important than any other area to eliminate depth.


· Utilizes the techniques of pentimenti. Show evidence of your process by covering and uncovering areas of the design.


· Emphasizes the process of making. Think about gestural abstraction and use techniques that allow the viewers to read your movement from while you were creating.


· Explores color. Consider using color field, characterized primarily by large fields of flat solid color, or the monochrome, characterized by utilizing one color and its values. Or look at color symbolism and create a meaningful color scheme.


· Emphasizes expression. Relay a strong emotion to the viewers by “spilling your guts” onto your design. Choose an emotional object, a personal object, or part of your own body of work to zoom in on to create your composition.


* Again you must choose one from each list for your final prints you hand in for a grade. Clearly mark what the choice was on the back in pencil or on a separate piece of paper.


Grades will be determined as follows:


Grading Rubric 
Picture
1 Comment

Defining Art

8/27/2013

0 Comments


What is Art?

Picture
This question "what is art?" is something I have my students re-visit at the beginning of each school year.  I find it very interesting and rewarding to see how the perception of art changes as students complete each level at DRHSART.

For this assignment, the class will be broken into small teams.  The goal of each team is to get to know each team member and collaborate to write a dynamic and collective paragraph that defines the team's definition of "art".  The paragraph should be written with proper grammar, and should have a rhythm of language that is pleasing when read aloud.


We will move into the Gallery at the end of the class, where your essays will be read by one of your team members, and I will take notes on how I interpret your definition.  At the end of the class, I will read back a collective definition from what I gathered as each team's essays were read aloud.

0 Comments
Forward>>

    ART 2 
    Assignments

    This blog is the growing archive of Art 2 Assignments for DRHSART.  You can search assignments by category or date below. 

    Archives

    January 2024
    December 2020
    November 2020
    September 2020
    October 2019
    September 2019
    March 2019
    September 2018
    January 2018
    March 2016
    October 2015
    August 2015
    March 2015
    August 2013

    Categories

    All
    Abstraction
    Art History
    Collage
    Hierarchy
    Icebreaker
    Introduction
    Mixed Media
    Painting
    Portrait
    Printmaking
    Team Based
    Team-Based
    Writing

    RSS Feed

Powered by Create your own unique website with customizable templates.